
 Today is a BIG day for Lin-er, though is not her super BIG day yet. It’s her 21st BIRTHDAY celebration for her super big day on 04 July 2012. Haha. Finally, she is a grown up fine lady with beautiful smile and character. The images of her when she was young still flashes in my mind. We are 10 years old apart, so as a da jie jie, it’s naturally my duty to take care of her since young. Seeing her grow up from a little baby and protecting (but sometimes still bully, haha) her from harm is such an enjoyable journey for her 3 elder sisters. Lin-er, we won’t be there to take care of you all the times, so be safe, be blissful and most importantly, be happy & healthy always!
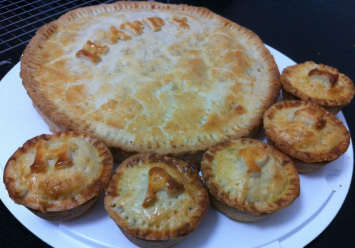
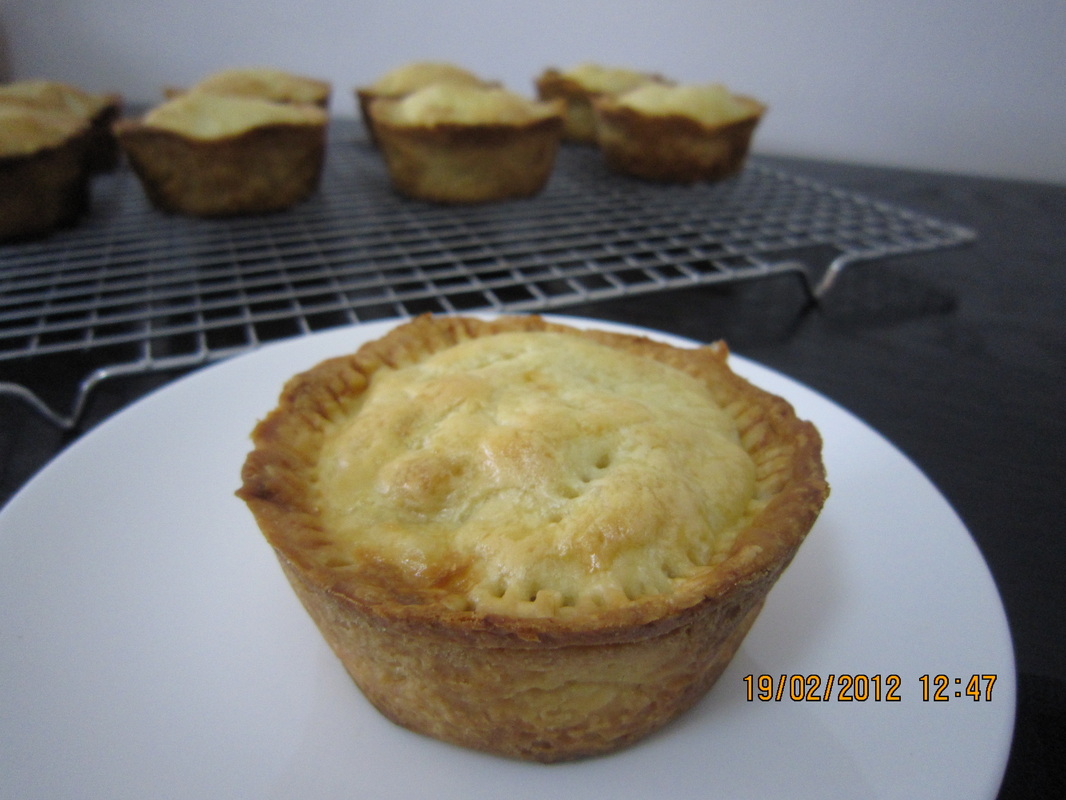
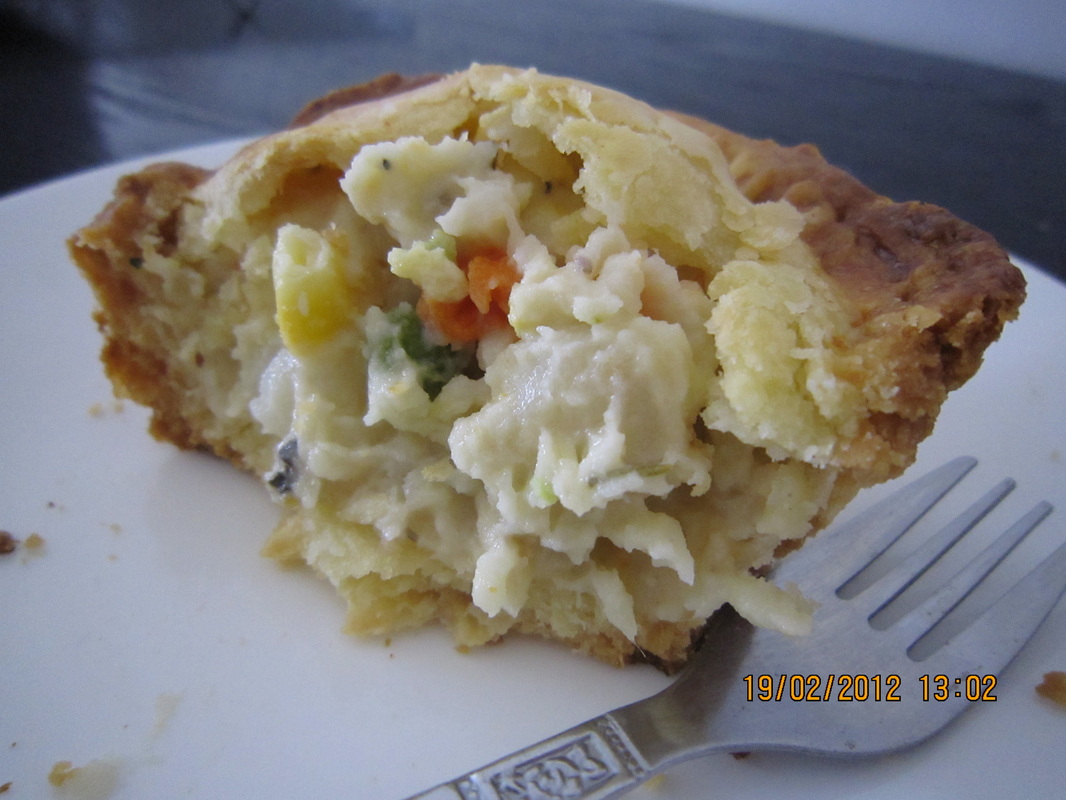
Here comes your Birthday Chicken Pie! I’ve started preparing this for you since the night before, thus I did not manage to join you and cuzzies for the happening night out. Sacrifice right? Lol. I knew this came as a surprise for you from the expression on your face when you first saw it. I was indeed delighted. I was even more elated when I received numerous amazing comments on the pie. It’s not the look of the pie, but the TASTE! Although I tried my best to put on some deco on it, I think I can still do better, don’t give up Wendy! This pie is the result of my 2nd try this morning. Luckily I had enough ingredients, else I can't imagine how things will turn out. I guess I am just too excited and hoping to complete the pie without pitfall. But the more I want it this way, the more I could not get the it done in the right way. Haiz. My initial intention is to bake a big pie with some small pies which serve as a deco to the big pie too. However, after pre-baking the big crust half way, then I realised I've forgotten to prick the crust before baking. That's why the crust wenting popping here and down all because of the air bubble underneath the dough. Things went a little hay wire but fortunately I managed to salvage it, just that I've spent a lot more time than expected. The baking process ended with a PHEW! finally completed and YEAH! :)
0 Comments
 Lin-er will be celebrating her 21st birthday very soon. I'm still in a dilemma on what I should give her as a memorable birthday present and thought something I bake specially for her will be a nice one, isn't it? Initially, I thought of baking swiss roll and kept practising it for 3 days in a roll. Shun, Ning and myself ate nothing but swiss roll for breakfast and dessert last week. Sorry darling, I don't know if I've made you tired of swiss roll, but am sure you are enjoying it whenever you asked for it. :)
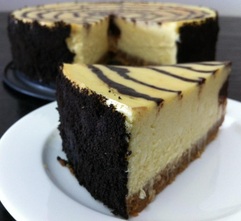
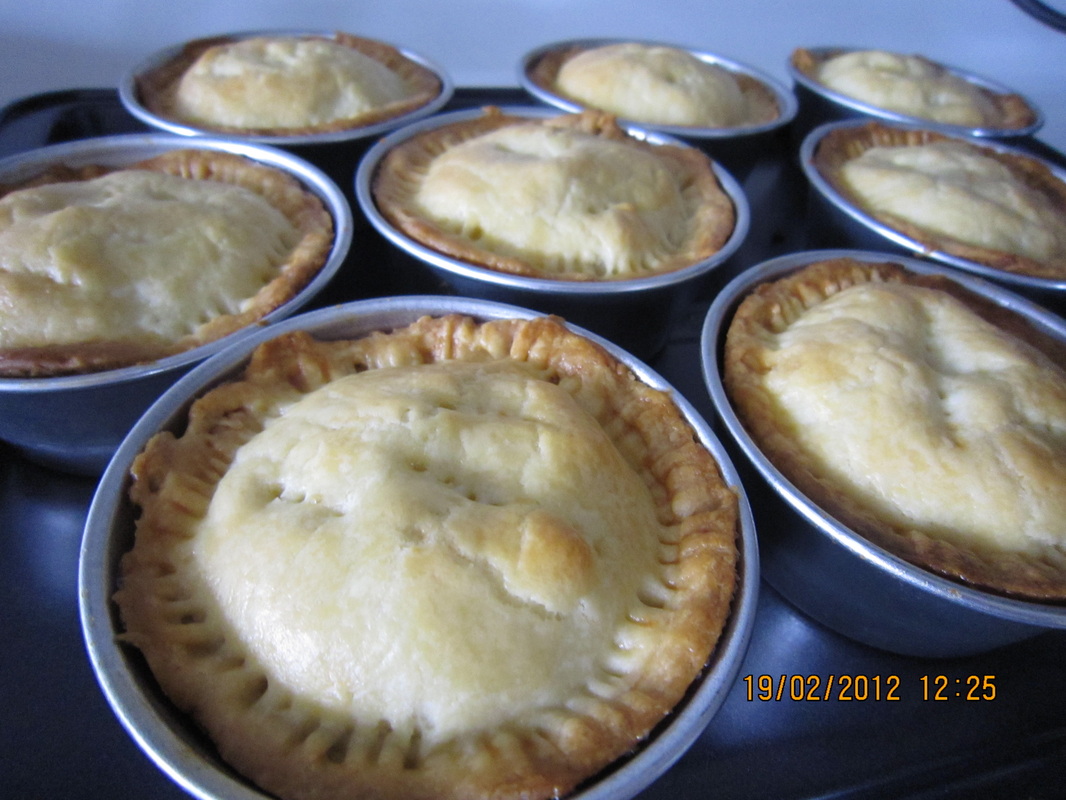
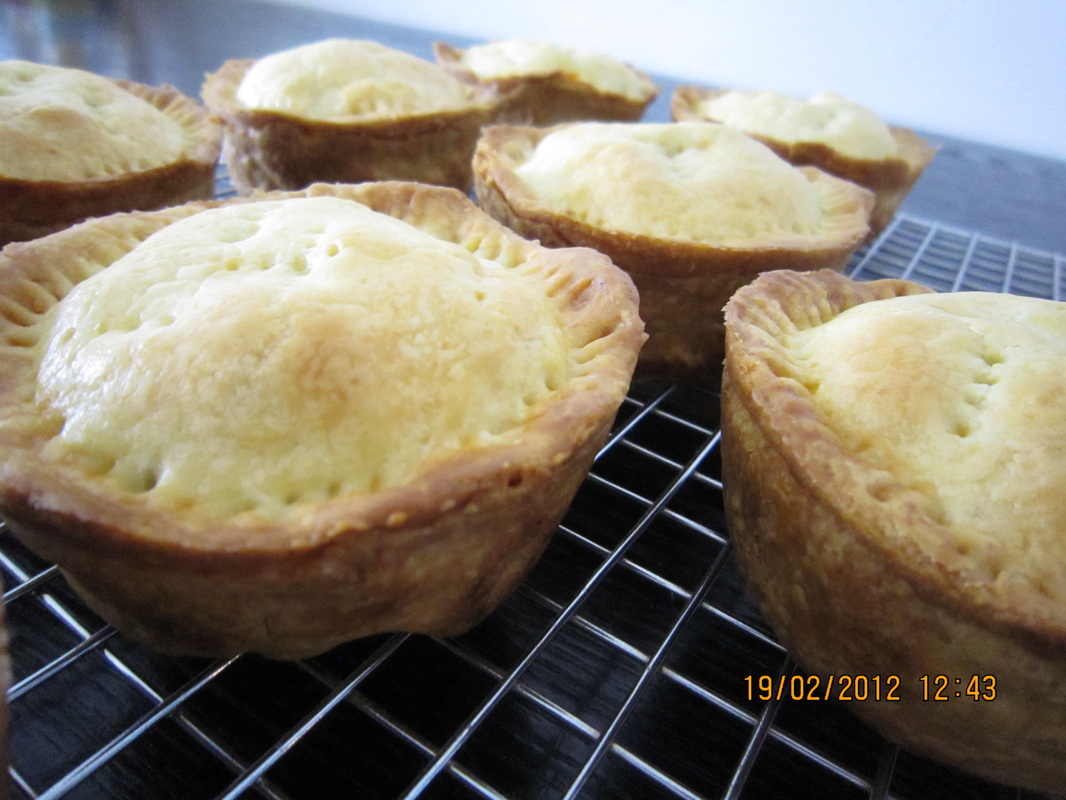
All of a sudden on the past Monday, I recalled Lin-er told me that my chicken pie is her favourite, so why not make her a chicken pie instead? Yes yes, and picture on the left is the result of the test bake in the wee hours this morning! The 5 small little ones were given to Lin-er for her colleagues since today is the last day of her internship and the big one went to my colleagues. Feedback on the pies were simply fantastic. I'm overwhelmed with all the nice comments. One of my colleagues even commented, "Wendy, you are so inspiring.", cos I've aroused their interest into cooking and baking again. Hahahaha. So this shall be Lin-er's 21st birthday present this coming Sunday! On our way home on 31 May 2012, Thursday evening after seeing a TCM, we boarded a bus at Chinatown. As soon as Ning boarded the bus and sat beside an old uncle, she covered her nose and ask what was that unpleasant smell? I was enjoying the aroma of durians, but felt a little embarassed by her question cos I knew it was that uncle hugging bags of durians in his hands. Immediately, the uncle unpacked his packages and handed over 3 boxes of durians and 1 box of jackfruit to us. We could not reject the offer as the uncle insisted us to accept them. Surprisingly, Ning said "thank you" instantaneously. I was laughinig to myself, I thought you said they were smelly? 3 boxes of durians!!! What am i going to do with them? Recently, the whole household was not feeling very well, durians will aggravate the matter, so eventually a box went to my mother in law and brother in law. I had wanted to bring the other 2 boxes to share with my colleagues, but afraid that they might invite complaints from the caucasians in the office, so the idea was dropped at the last minute. An idea came... why not a durian cake? With that, I went online to search for recipe and found this baked durian cheesecake recipe from Grace Kitchen Corner and decided that I should give this recipe a go. The result was a delectable dessert with rich aroma of durians embedded in cream cheese. I did not blend the durians as I wanted a cake with a little durian strands to go in between the teeth when we sink into the cheesecake. OMG! This is so devilish, yet so heavenly! Feedback from family and friends are.... this is really really yummy! Not too sweet with aroma of durians in every bite. Durians and cheese are wonderful combination. My hiccup was the not so well done design though and the control of temperature not so fantastic. I feel that the texture could be a little firmer which I'm still thinking how to go about that. Below is the recipe and I did only a little modifications: Recipe for 8 inches: For the base: 200g digestive biscuits 100g butter, melted (I use 80g) For the filling: 500g cream cheese caster sugar 220g durian flesh (I use 250g in order to finish using what I have) 3 eggs (medium size, total about 160g) 90ml milk 1 tbsp cornstarch + 1/4 tsp cornstarch Deco: 1 tsp cocoa powder + 2tsp water & some Oreo cookie crumbs for the side. Method: 1. To make the base, stir all ingredients until combined. Press mixture into base. Set aside. (I baked the crust at 180C for 8-10min in order to harden the base. Just a note: this will give a thick crust, you might want to reduce the digestive biscuit and butter accordingly if you want to have thinner crust.) 2. To make the filling, beat cream cheese, sugar and durian flesh until smooth. Beat in eggs, one at a time, beating well after each addition. 3. Beat in milk and cornstarch until blended. Reserve 1 tbsp cheese mixture for topping, the rest mixture pour into tin. 4. To make the topping, mix well cocoa powder with water. Add in 1 tbsp of reserved cheese mixture, stir until well blended. Pipe on top of the surface of cheese mixture and draw net pattern with skewer. 5. Steam baked at 170C for 45 minutes (my oven 150C for 50 minutes) or until light brown. 6. Remove from the heat and leave to cool completely. Chill in fridge 5 hours or overnight. Decorate sides of cake with crushed Oreo cookie crumbs.
I've been tied up with so many activities recently that I had no time to update my webbie. Ning and Feng had not been feeling well since February. The hateful virus had hospitalised Feng again. Ning continued to have the persistent cough until recently, it was under control. Together with this, Feng went into his teething stage which made him suffered tremendously from diarrhea and fiery red bum for nearly 2 weeks! Life was filled with so many downs these 2 to 3 months and I'm hoping for a better tomorrow everyday.
I'm also busy designing a photobook for Feng for his first year. This took me almost 2 weeks from scratch to completion. Though waking up in the middle of the night to finish the photobook was no easy task, I'm enjoying my fruit of labour now. With such an eventful period, I did not give up my time on baking. It was not as frequent, but I'll still try out recipe here and there, just that I am not able to post them here as soon as I want it to be. Remember that I had commented that my new oven does not seems to be working well? I got in touch with Rowenta's service centre and I'm glad I made the right move. The after sales service was nothing but excellent. They were prompt in giving attention to the matter which gave me comfort that my purchase was not down into the drain. After many correspondences via email and phone calls, I got a new set in about a month's time. And I manage to make a trip to Taka Square for a demo provided by a Rowenta's expert. I learnt more functions about the oven now. I didn't know that we should always use the fan mode for even baking. Maybe it is specially designed for Rowenta's oven only? I'm puzzled but as long as it serves me well and bake great goodies, I wouldn't mind so much, am I right? I will be testing out soon again. Till then. : )
Getting my hands on pies today. It took me about 2 to 3 hours for baking 9 pies. I think I could have better manage my time. Shun had already helped a lot, by keeping an eye on the filling. Both of us ended the baking with a phew... finally done! I've decided to use fish instead of chicken this round as the old wives tale told me to avoid chicken since Ning was having a bad cough. So in order to let Ning have a go on these pies, here they are. I could have use the sutchi fillet, which is a lot cheaper, but I don't really like the taste of sutchi, hence, I ended up using the white snapper. Hmmm... the flesh of snapper fillet was simply tangy which allows the enjoy-er to get a touch of fish in the pies! The best thing I like about it is that it does not have a fishy or muddy taste. Great! These are perfect snacks for a Sunday afternoon for my family, especially for my 3 lovable sisters. They fell in love with the pies immediately and begging for more. However, they would prefer to have it in a smaller size, so that SHARING is not required and they can have the whole pie to themselves. LOL.
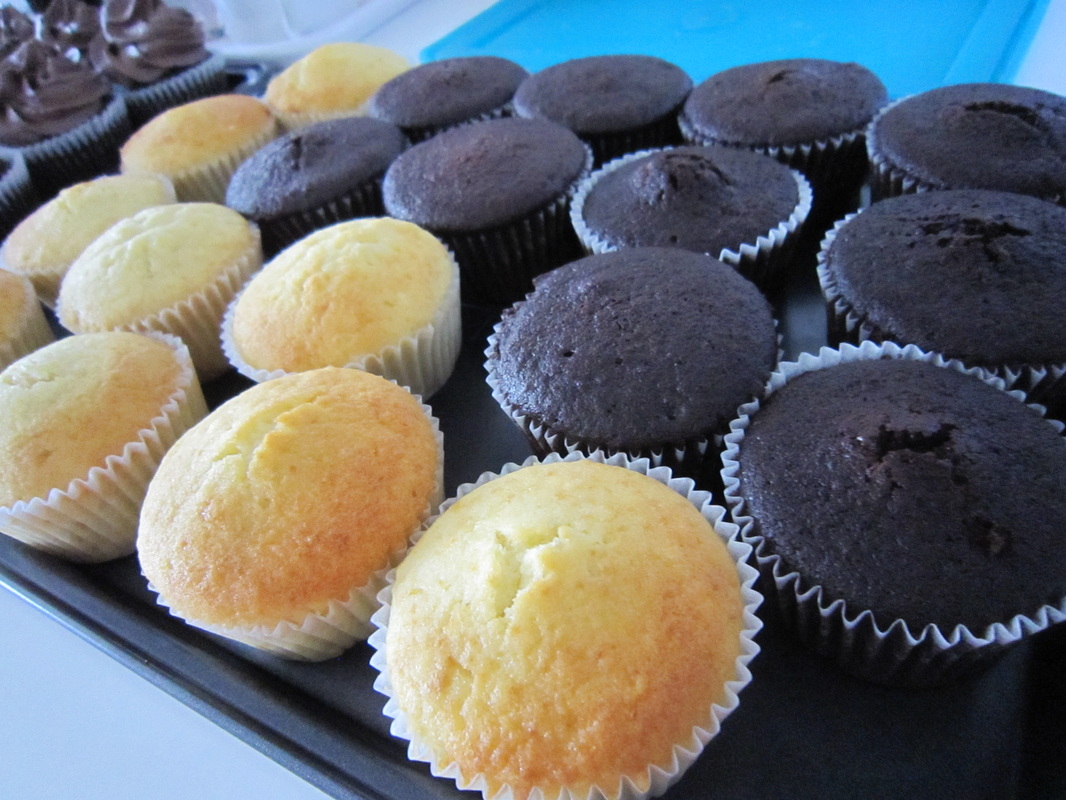
Finally Feng is coming to a year old. He is now such a little mobile monster, creating a huge mass in the house, however most of the time he is craving for some comfort which makes him become a cuddly sweetie. : ) We threw a birthday party for him on 28 Jan 2012 (his 1st lunar birthday), Saturday and in preparation for that, I decided to bake some cupcakes for the guests. But I am still encountering problems with the frosting. They are either too sweet or they can't stand long at room temperature. So for this round, I went ahead with the vanilla buttercream and chocolate buttercream which had not failed me. They made nice swirl and could be left out for a longer period. I bake a total of 48 cupcakes (24 vanilla and 24 chocolate). The vanilla one was made a day before cos I knew I won't have enough time for 2 batches of cupcakes on the actual day. So on Saturday morning, I baked the chocolate cupcakes and buttercream. And true enough, I was lack of time, luckily my lovely sisters came to my rescue to help with the decoration and packing them into box for transportation to the birthday venue. Now... feedback on the cupcakes: 1) Chocolate cupcakes were delicious with just right texture. 2) Vanilla cupcakes were a bit dry. 3) Buttercream cream was too sweet. I prefer the ones with little icing sugar instead. 4) Oh... the cupcakes were beautiful. 5) The kids simply love it, especially the frosting. 6) Can I pack some home? I'm glad my guests enjoyed themselves at the event. I would call that an eventful day though I'm simply exhausted. But still wanna say... HAPPY BIRTHDAY, FENG! Hope you will appreciate from the pictures what papa and mummy had done for you when you grow up.
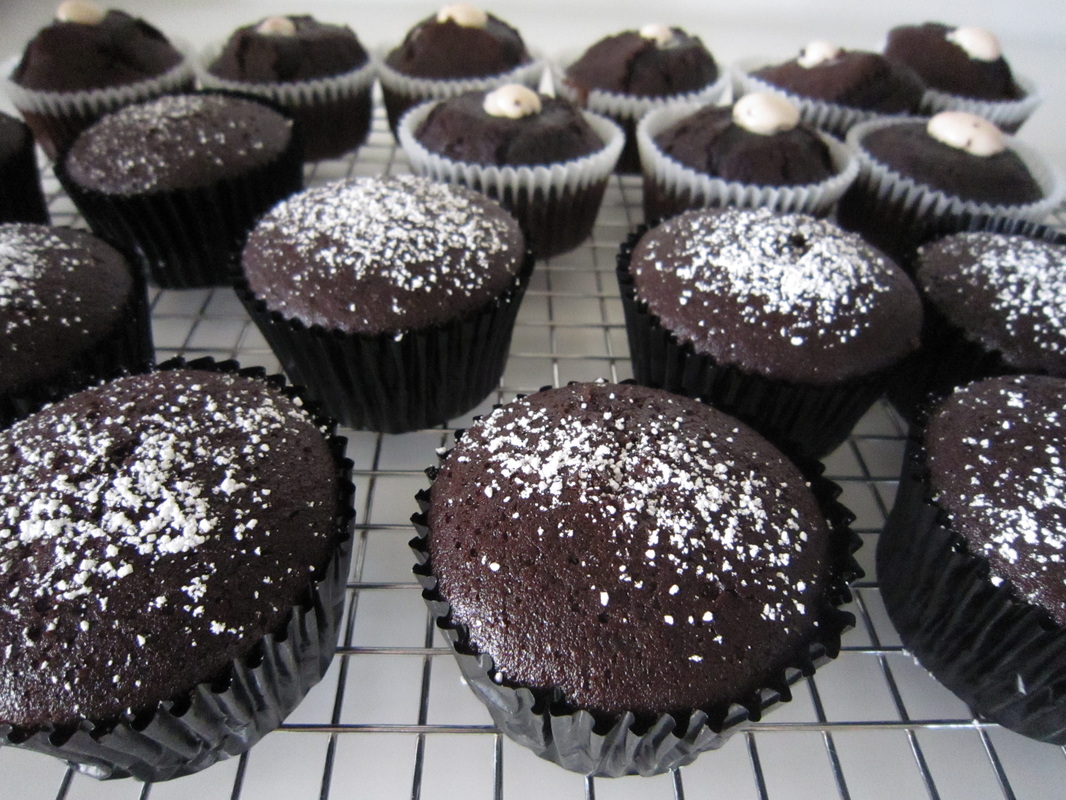
In consecutively 2 days on 20/01/2012, Friday night and 21/01/2012, Saturday night, I baked the chocolate cupcakes again! This time I baked using 2 layers with a total of 24 cupcakes at the same time. OH MY GOD! My top layer cupcakes went bursting on the crust due to the sudden high temperature when I was not looking. It went up to 205 degrees! Oh my god, what happen? I was totally clueless. I tried the again the next day, the same thing happened. I was quite sure I should be using the traditional convection mode, am I wrong? I thought fan should not be used in baking of cakes, so I stayed at the convection mode. The cupcakes had gone lop-sided due to the high heat from the top heating element. Luckily the cupcakes at the bottom layer were doing fine. So I dust some icing sugar on the nicer ones and fill the uglier ones with strawberry cream cheese. Now... to the kids, who cares, as long as they were chocolate, who won't says yummy. Haha.
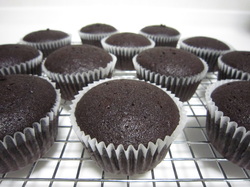 It's 02:28 now. I had just finish up cleaning after my baking session. Presenting here my 1st baked goods with Rowenta... drum roooooll... The naked chocolate cupcake. They looked fine with a nice top. These cupcakes are not meant to have a dome, it is kind of flat as per the recipe. It also mentions that these cupcakes are with a moist texture and especially good after being in fridge for a day. But... what is the real taste??? Ermmm... its rather late now, guess I should hold on, my waist line seems to be giving way recently. I'll add on the calories tomorrow morning. Hehe. Addition to the above post: Below is the frosting that I've done... following the recipe called, "That's the best frosting I ever had", which was made using butter, flour, milk and granulated sugar. FLOUR??? Yes, flour! My first time hearing frosting using flour, so I give it a try. Consistency was fine, however I don't really like it (i find it too sweet and I could taste flour!), although both Shun and Lin-er said it taste good, especially it goes quite well with the not-so-sweet chocolate cupcake. Oh ya... talking about the chocolate cupcake, it is really quite moist and texture was just right. But something is still not there. I don't know what is it, but it is just not right yet. I'll do more experimentation on that. Oh dear.... that means more $$$! 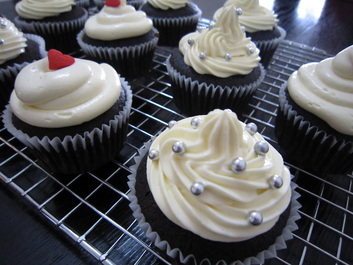 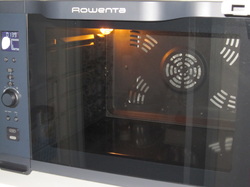 Starting 1st use to get rid of manufacture odour. There was a little fault in the oven that was delivered on 31 Dec 2011, thus an exchange was done on 05 Jan 2012. I had prepared for its first use on 07 Jan 2012, and only to realize it has no preheat function! OMG! What am I going to do? Immediately, google for an answer is what I can only think of. After doing some research, only did I know that it actually is not any big deal not to have a preheat function. Even if an oven had a preheat function, it might not be accurate as well. The most trusted equipment for this role would still be an oven thermometer. So what I need to do is to just place an oven thermometer in an oven and switch it on for about 10min to 15min. Once the oven reach the required recipe temperature, that’s all what I need to do in order to preheat an oven. Coming to think of it now, I feel so stupid to think that no preheat function is a VERY BIG DEAL! And I almost feel so sad getting such an expensive oven without this function. Haha. I might have been spoilt by by Sharp microwave oven which comes with preheat function and it usually takes me around 2 to 3 mins. But never did I know that the temperature might not be correct. This prove that I'm really novice to baking at this juncture. I really got a lot more to learn and I will continue learning... 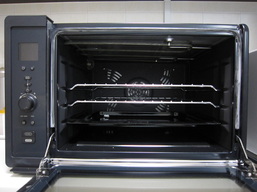 The interior of Rowenta OC7868 |
AuthorWendy, the creator of TwoThreeFiveNine is a full time working mummy to 2 lovely kids, a wife to a loveydovey husband, a daughter to 2 loving parents and a sister to 3 lovable sisters. Still a novice to baking but simply with the passion, here she is baking into the night after 2359 (mummy's duty done by then), creating freshly baked goodies for her precious ones. Archives
February 2014
Categories
All
|


 RSS Feed
